

Click for larger view
This tutorial was written by Sharon A on Apr 11, 2012 & is copyright protected
For more info read my TOU
Supplies Needed
New scrapkit Spring Dreams by Jenny at Jennys Designz here
Plugins
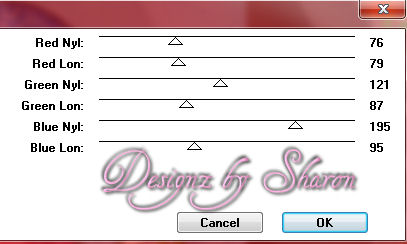
DC Special Nylon
Eyecandy Texture
The tube I used Lily Bloom (4-1) is by Samantha Nowak, you can purchase this tube from CDO here
The name of my font is Tagettes
I used size 36 for my text & 48 for my name
Open new transparent canvas 700x700, we will resize later
Select all
Open paper 3, resize to 700x700 pixels
Copy & paste into selection
Deselect
Apply dc special nylon with these settings
Repeat
Paste your tube as a new layer
Add drop shadow
Using your magic wand, tolerance 25, hold down your shift key & click around on the blue circle
If your using a different tube then use your freehand selection tool & select around the wings
Duplicate 2 times
Apply eyecandy texture noise set on sparkle
Repeat on other 2 layers clicking on the random seed button each time
Deselect
Paste grass as a new layer
Resize to 75%
Move to lower left corner
Add drop shadow
Duplicate & mirror
Duplicate & move to the center
Merge these 3 layers
Paste flower 3 as a new layer
Resize to 10%
Position lower right side
Add drop shadow
Move to below your grass layer
Duplicate & mirror
Paste grass 2 as a new layer
Resize to 60%
Add drop shadow
Positon on left side
Duplicate & mirror
Move to below your grass layer
Paste flower 5 as a new layer
Resize to 10%
Position near the left, as shown on my tag
Add drop shadoe
Duplicate & mirror
Paste flower 1 as a new layer
Resize to 60%
Add drop shadow
Move to near the right side
Move to below your grass 2 layer
Paste flower 2 as a new layer
Resize to 10% then again to 75%
Position near the left bottom of your tube
Add a drop shadow
Move to below your grass layer
Duplicate & mirror
Duplicate again & position in between the other flower 2 layers
Paste geese as a new layer
Reize to 50%
Position near lower left
Add drop shadow
Duplicate & mirror
I moved them up a bit
Paste dog as a new layer
Resize to 35%
Position lower center
Add drop shadow
Resize all layers to 70%
Add your text, name & © info
Animation:
Hide animation 2 & 3
Merge visible
Copy & paste into animation shop
Undo your merge
Hide animation 1 & unhide #2
Merge & paste after current in animation shop
Undo your merge
Hide animation 2 & unhide #3
Merge visible & paste after current in animation shop
View your animation
Save as gif & you're all done!
I hope you enjoyed my tutorial
Your comments are very much appreciated either here on this post or on the chat box. I've made it easy for you to post on this tut by turning off the requirement of having to type in a confirmation code
I would love to post your © compliant result, just email it to me with ATT Sharon & the tut name in the subject line
You'll find my email blinkie on your left
:)
Result by Kaye W

No comments:
Post a Comment
Please keep your language clean, thank you!