

Click for larger view
This tutorial was written by Sharon A on Apr 8, 2012 & is copyright protected
For more info read my TOU
Supplies Needed
Stars here
Plugins
DC Special Nylon
Graphics Plus Cross Shadow
Eyecandy Texture Noise
The tube I used Moon Light Falls (7-1) is by Melissa Dawn, you can purchase this tube from CDO here
The name of my font is FranciscoLucas Briosa
I used size 48 for my text & 60 for my name
Open new transparent canvas 700x700, we will resize later
Floodfill with a color from your tube
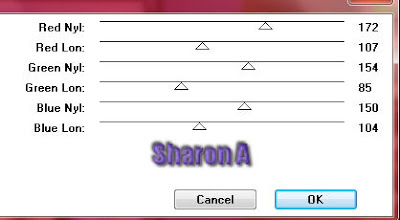
Apply dc special nylon
I used these settings, you may have to play around depending on your color
Apply graphics plus cross shadow changing the 2 bottom #'s to 100
Paste your tube as a new layer
Select around the wings with your magic wand or freehand selection tool
Duplicate 2 times
Apply eyecandy texture noise settings on diamond noise
Repeat on other 2 layers clicking on the random seed button each time
Deselect
Using your rectangle shape tool set your foreground to a dark color from your tube
Set the width at 18
Background null
Draw a square around your tube, make it slightly smaller than your tube
Align center
Convert to raster
Using your magic wand click inside your frame
Expand 3
Add a new raster layer
Floodfill with a lighter shade of your color
Paste your flowers as a new layer
Change layer properties to luminance
Add drop shadow
Add an inner bevel & drop shadow to your frame
Resize all layers to 70%
Add your text, name & © info
Animation:
Open your shooting stars in animation shop
Activate frame 1 and select all
Hide animation 2 & 3
Merge visible
Copy & paste into animation shop
Undo your merge
Hide animation 1 & unhide #2
Merge & paste after current in animation shop
Undo your merge
Hide animation 2 & unhide #3
Merge & paste after current in animation shop
Select all & copy
Activate frame 2
Paste after current
Activate your last frame
Paste after current
Repeat until you have 21 frames
When you start placing them on the right side of your tag, reverse the star frames (shift r)
Activate frame 1 and select all
Grab the star by frame 1 and drop it onto frame 1 of your tag
Go back to your stars
Undo (CTRL Z)
Drag onto your tag again
Repeat this as many times as you want
View your animation
Save as gif & you're all done!
I hope you enjoyed my tutorial
Your comments are very much appreciated either here on this post or on the chat box. I've made it easy for you to post on this tut by turning off the requirement of having to type in a confirmation code
I would love to post your © compliant result, just email it to me with ATT Sharon & the tut name in the subject line
You'll find my email blinkie on your left
:)
Result by Kaye W

No comments:
Post a Comment
Please keep your language clean, thank you!