Click for larger view
This tutorial was written by Sharon A on Apr 8, 2012 & is copyright protected
For more info read my TOU
Supplies Needed
Flower here
Plugins
DSB Flux Bright Noise
The tube I used Roseilee is by Sara Butcher, you can purchase this tube from CDO here
The name of my font is FranciscoLucas Briosa
I used size 42 for my text & 48 for my name
Open new transparent canvas 700x700, we will resize later
Floodfill with a color from your tube
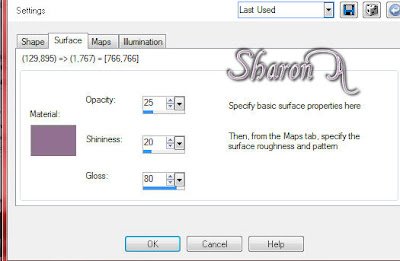
Add texture with these settings
Paste flower as a new layer
Move down a tad bit
Change layer properties to luminance legacy
Add drop shadow
Duplite 2 times
Apply dsb flux bright noise intensity 25, mix checked
Repeat on other 2 layers changing intensity to 30 & 35
Paste your tube as a new layer
Add drop shadow
Zoom in close
Using your freehand selection tool select around the fins
Copy & paste as a new layer 3 times
Cut the original one
Use your eraseer to get rid of any lines left
Move one of the fins back into position
Rotate one left 20 & the other one right 20
Make sure the one which is in the original position in placed in between the other 2 layers
You may have to use your clone tool to cover any seams
Add a new raster layer
Effects>artisit effects>balls & bubbles
Use these settings

Move to below your tube layers
Resize all layers to 70%
Add your text, name & © info
To get your text going in a circle like mine (it's not really hard) do this
Activate your elipse shape tool
Foreground any color, you want it contrasting, we'll be deleting it later
Background null, width 1
Draw a circle around your bubble making it smaller
Don't worry too much about size you can resize it if needed
Align center
Resize if needed then realign again
Select your font, size & color
you don't want it too big, I used size 42 with my font listed above
Add a new vector layer
Place your text tool at the top of your circle
When you see the little A click
Type in your text
I added 2 spaces in between the phrase Faery Mermaid to even it out
You may have to play with this & font size
Align horizontal center
When you're done convert to raster layer
Add inner bevel & drop shadow
Delect your vector circle layer
Now I resized my bubble a bit, yours may be different
I unchecked the lock aspect ratio button and resized the width to 93% and nudged it to the right a bit
I then resized the height to 98% and nudged it down a bit
Animation:
Hide your middle & bottom animation layers
Merge visible
Copy & paste into animation shop
Undo your merge
Hide the top animation layers & unhide the middle ones
Merge & paste after current in animation shop
Undo your merge
Hide the middle animation layers & unhide the bottom ones
Merge visible & paste after current in animation shop
I set my frame properties on 20
View your animation
Save as gif & you're all done!
I hope you enjoyed my tutorial
Your comments are very much appreciated either here on this post or on the chat box. I've made it easy for you to post on this tut by turning off the requirement of having to type in a confirmation code
I would love to post your © compliant result, just email it to me with ATT Sharon & the tut name in the subject line
You'll find my email blinkie on your left
:)
Result by Kaye W


No comments:
Post a Comment
Please keep your language clean, thank you!