Wednesday, July 18, 2012

Naughty Nurse

Click for larger view

This tutorial was written by Sharon A on July 18, 2012 & is copyright protected
For more info read my TOU

Plugins
Mura Meister Copies
DSB Flux Bright Noise

The tube I used Realistic Nurse Claire (106-1) is by Deacon Black, you can purchase this tube from CDO here

The name of the font I used is Writers Block

For the purpose of this tut I am going to assume you're using the same or another black & white tube


Open new transparent canvas 930x420, we will resize later
Floodfill with a color of your choice

Paste your tube as a new layer
Duplicate & hide

Apply mura meister copies
Preset menu on wallpaper rotate, use default settings
Add gaussian blur>radius 16

Move your background layer to above your copies layer
Change layer properties to screen

Unhide your tube
Add a drop shadow
Duplicate & mirror
Change the layer properties of the duplicated tube to luminance legacy

Duplicate your bg layer
Move to in between your tube layers

Add a new raster layer, name it bubbles
Effects>artistic effects>balls & bubbles
Use these settings
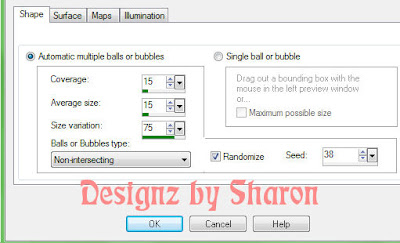


Click on surface, change shininess to 75
Click on maps, click on bump map & select twirl

Repeat 2 more times adding a new raster layer for each
Increase the random seed by 1 each time

Add a new raster layer & activate your selection tool set on rectangle
Draw out a rectangle as shown on my tag
Floodfill with your bg color
Apply bright noise, intensity 40, mix checked

Duplicate
Select all>float>defloat
Contract 12
Delete & deselect
Add an inner bevel & drop shadow

Add your text
Repeat bright noise

Duplicate your bg layer again
Move to the top
Change layer properties back to normal
Select all
Contract 12
Delete & deselect
Add an inner bevel & drop shadow
Repeat bright noise

Resize all layers to 70%

Increase your font size and add the word Naughty
Position at the top & align horizontal
Add an inner bevel & drop shadow
Repeat bright noise

Add your name & © info


Animation:

Hide animation 2 & 3
Copy merged & paste into animation shop

Undo your merge
Hide animation 1 & unhide #2
Copy merged & paste after current in animation shop

Undo your merge
Hide animation 2 & unhide #3
Copy merged & paste after current in animation shop

View your animation

Save as gif & you're all done!

I hope you enjoyed my tutorial

Your comments are very much appreciated either here on this post or on the chat box.  I've made it easy for you to post on this tut by turning off the requirement of having to type in a confirmation code

I would love to post your © compliant result, just email it to me with ATT Sharon & the tut name in the subject line

You'll find my email blinkie on your left

:)


Thursday, July 12, 2012

So Sexy

Click for larger view

This tutorial was written by Sharon A on July 12, 2012 & is copyright protected
For more info read my TOU

Plugins
Eyecandy Texture Swirl
Graphics Plus Cross Shadow
Xenofex Constellation
DSB Flux Bright Noise
Xero Porcelain
Mura Meister Copies

The tube I used Busty Wench (60-2) is by Jamie Kidd, you can purchase this tube from CDO here

The name of the font I used is Honey Script Light


Open new transparent canvas 930x420, we will resize later
Floodfill with a color from your tube
Apply eyecandy texture swirl
Settings on random large no twist long streaks
Apply cross shadow using default settings

Duplicate 2 times
Apply constellation
Settings on star field, keep original image checked
Repeat on other 2 layers clicking on the random seed button each time

Add a new raster layer
Activate your selection tool, set on rectangle
Starting at point 0, 90 and ending at 930, 200 make your selection
Floodfill with your bg color
Apply bright noise, intensity 35, mix checked

Contract selection 12
Selections>modify>select selection borders
Settings on Outside, width 12, anti alias checked

Adjust>brightness/contrast
Brightness -50 contrast 12
Add an inner bevel
Deselect

Paste your tube as a new layer
Resize as needed
Apply porcelain using default settings
Add drop shadow

Add a new raster layer
Activate your selection tool, set on rounded rectangle
Select around your tube, making the selection slightly bigger than your tube
Floodfill with a lighter or darker shade of your bg color
Deselect
Click with your magic wand
Contract 26
Delete & deselect

Click inside your frame with your magic wand
Expand 5
Activate your tube layer
Invert your selection
Delete & deselect

Click inside your frame again with the magic wand
Expand 5
Add a new raster layer
Floodfill with another shade of your bg color
Apply the same effects as on your bg
Move to below your tube layer

Click on your frame with the magic wand
Selections>modify>inside/outside feather 25

Selections>modify>contract>25

Adjust>brightness/contrast
Brightness at 75, contrast at 12
Deselect
(This will give it that nice rounded look)

Duplicate your bg layer and send to the top
Select all
Contract 12
Delete & deselect

Click on the border with your magic wand
Inside/outside feather 15

Activate your bg layer
Brightness/contrast -50 +12

Activate your border layer
Contract 15
Brightness/contrast 75 & 12
Add an inner bevel

Activate your text tool
I used honey script light size 36
Use a slightly different shade than your bg layer
Type your words
Apply mura meister copies
Preset menu on tiling angle, default settings
Move to above your bg layer

Resize all layers to 70%

Add your text, name & © info
Apply constellation to your name & text, same as before


Animation:

Hide animation 2 & 3
Copy merged & paste into animation shop

Undo your merge
Hide animation 1 & unhide #2
Copy merged & paste after current in animation shop

Undo your merge
Hide animation 2 & unhide #3
Copy merged & paste after current in animation shop

View your animation

Save as gif & you're all done!

I hope you enjoyed my tutorial

Your comments are very much appreciated either here on this post or on the chat box.  I've made it easy for you to post on this tut by turning off the requirement of having to type in a confirmation code

I would love to post your © compliant result, just email it to me with ATT Sharon & the tut name in the subject line

You'll find my email blinkie on your left

:)


Wednesday, July 11, 2012

On The Beach

Click for larger view

This tutorial was written by Sharon A on July 11, 2012 & is copyright protected
For more info read my TOU

Supplies Needed
Scrapkit On The Beach by Mysterious Scrapgirl here

Plugins
Graphics Plus Cross Shadow
DSB Flux Bright Noise

The tube I used Beach Party (12-1) is by Sherri Baldy, you can purchase this tube from CDO here

The name of the font I used is Aquarelle


Open new transparent canvas 700x700, we will resize later
Select all, paste paper 3 into selection
Deselect
Apply cross shadow using default settings

Paste your tube as a new layer
Resize as needed
Add drop shadow

Paste flower ribbon 1 as a new layer
Position at the top of your tube so the bottom is just touching the head
Duplicate & flip
Duplicate & move to the top
Rotate left 90
Position on the left of your tube
Duplicate & mirror

Position the top & bottom flower ribbons so they cover the metal part of the side ribbons
(Refer to my tag)

Merge all the ribbon layers
Move to below your tube
Click inside with your magic wand
Expand 5
Add a new raster layer
Paste paper 2 into selection
Deselect
Move to below your frame layer

Add a drop shadow to your frame
Duplicate 2 times
Apply bright noise, intensity 45, mix checked
Repeat on other 2 layers changing the intensity to 50 & 55

Paste Mr ant as a new layer
Resize to 35%
Position near the bottom left
Add drop shadow
Duplicate & mirror

Paste towel 1 as a new layer
Resize to 50%
Position in between the 2 ants so it looks like they're holding it up
Move to below your ant layers
Add drop shadow

Paste hat 2 as a new layer
Resize to 35%
Position on the upper left corner of your ribbon frame
Rotate left 30
Add drop shadow
Duplicate & mirror

Paste the beaded string as a new layer
Position on the left as shown on my tag
Add a drop shadow
Duplicate & mirror

Paste insect as a new layer
Resize to 30%
Position over the top of the string
Rotate left 100
Add drop shadow
Duplicate & mirror

Resize all layers to 70%

Add your text, name & © info


Animation:

Hide animation 2 & 3
Copy merged & paste into animation shop

Undo your merge
Copy merged & paste after current in animation shop

Undo your merge
Copy merged & paste after current in animation shop

View your animation

Save as gif & you're all done!

I hope you enjoyed my tutorial

Your comments are very much appreciated either here on this post or on the chat box.  I've made it easy for you to post on this tut by turning off the requirement of having to type in a confirmation code

I would love to post your © compliant result, just email it to me with ATT Sharon & the tut name in the subject line

You'll find my email blinkie on your left

:)


Sunday, July 8, 2012

Oriental Beauty

 Click for larger view

This tutorial was written by Sharon A on July 8, 2012 & is copyright protected
For more info read my TOU

Plugins
Xero Fritillary
Xero Porcelain
DSB Flux Bright Noise
Xenofex Constellation

The tube I used 148-3 is by Pinup Toons, you can purchase this tube from CDO here

The name of the font I used is Tagettes


Open new transparent canvas 930x420, we will resize later
Floodfill with a color from your tube
Apply fritillary changing the top # to 16 & the bottom # to 12

Paste your close up tube as a new layer
Resize as needed
Duplicate

Position one of the tubes to one side
Change layer properties to soften
Duplicate & mirror

Add a drop shadow to your main tube
Apply xero porcelain using default settings

Using your magic wand select the flowers in the hair and the lip
Duplicate 2 times
Apply dsb flux bright noise, intensity 35, mix checked
Repeat on other 2 layers changing intensity to 40 & 45

Resize all layers to 70%

Add your text, name & © info

Apply constellation to your text & name
Settings on low density stars, keep orginal image checked


Animation:

Hide animation 2 & 3
Copy merged & paste into animation shop

Undo your merge
Hide animation 1 & unhide #2
Copy merged & paste after current in animation shop

Undo your merge
Hide animation 2 & unhide #3
Copy merged & paste after current in animation shop

View your animation

Save as gif & you're all done!

I hope you enjoyed my tutorial

Your comments are very much appreciated either here on this post or on the chat box.  I've made it easy for you to post on this tut by turning off the requirement of having to type in a confirmation code

I would love to post your © compliant result, just email it to me with ATT Sharon & the tut name in the subject line

You'll find my email blinkie on your left

:)


Result by Kaye W


Saturday, July 7, 2012

Take Me

Click for larger view

This tutorial was written by Sharon A on July 7, 2012 & is copyright protected
For more info read my TOU

Supplies Needed
Bone by me, right click to save
 Plugins
Mura Meister Copies
DC Special Nylon

The tube I used Suitcase Yorkie (25-2) is by  Maryline Cazenave, you can purchase this tube from CDO here

The name of the font I used is Edmunds


Open new transparent canvas 930x420, we will resize later
Floodfill with a color from your tube
Apply dc special nylon using default settings

Paste your bone as a new layer
Duplicate & hide the duplicated layer

Apply mura meister copies
Preset menu on tiling angle, gap 2
Change layer properties to burn
Add an inner bevel

Paste your tube as a new layer
Resize if needed
Add drop shadow

Unhide your bone & send to the top
Use your manual color correction to change the color
Change the sourse to white and the target to your color choice
Duplicate & hide the duplicated layer

Apply mura meister copies
Preset menu on line, number 13
Position near the bottom, leaving a space
Duplicate & flip
Merge down
Add an inner bevel & drop shadow

Unhide your duplicated bone
Resize the width to 75%
Reposition back to the center of your tag
Repeat copies changing # to 17

Move to above the angled bones layer
Duplicate 2 times
Effects>distortion effects>wave with these settings


Repeat on other 2 layers increasing the wave length by 1 on each layer
Hide the 2 bottom wave layers

Resize all layers to 70%

Add your text, name & © info


Animation:

Hide animation 2 & 3
Copy merged & paste into animation shop

Undo your merge
Hide animation 1 & unhide #2
Copy merged & paste after current in animation shop

Undo your merge
Hide animation 2 & unhide #3
Copy merged & paste after current in animation shop

View your animation

Save as gif & you're all done!

I hope you enjoyed my tutorial

Your comments are very much appreciated either here on this post or on the chat box.  I've made it easy for you to post on this tut by turning off the requirement of having to type in a confirmation code

I would love to post your © compliant result, just email it to me with ATT Sharon & the tut name in the subject line

You'll find my email blinkie on your left

:)


Result by Kaye W