Showing posts with label Tim Lowery. Show all posts

Wednesday, August 17, 2011

Roughin' It

All my tuts today are dedicated to Jolene & all of the PTE Staff to show my support

Click for larger view

This tutorial was written by Sharon on August 17, 2011
For more info read my TOU

Supplies Needed
Scrapkit Roughin' it here
(Look for download password in her TOU)

Clouds Pattern


The tube I used is by Tim Lowery, you will need a license to use which you can purchase from PTE here

Open a new transparent canvas 700x700, we will resize later
Floodfill with a sky pattern

Paste element 2 as a new layer
Resize to 35%
Using your magic wand, click inside the frame
Expand 15
Paste paper 1 into selection
Do Not Deselect

Paste your tube as a new layer
Resize as needed
Invert your selection
Delete
Deselect

Paste element 1 as a new layer
Resize to 15%
Position lower left
Add drop shadow

Paste element 8 as a new layer
Resize to 20%
Position to the right of the tent
Add drop shadow

Paste element 6 as a new layer
Resize to 15%
Position in front of the tent
Rotate left 20
Add drop shadow

Paste element 9 as a new layer
Resize to 8%
Position on or near the lantern
Rotate right 45
Add drop shadow

Paste element 4 as a new layer
Resize to 25%
Position onto the camp fire
Add drop shadow

Paste element 3 as a new layer
Resize to 25%
Rotate left 25
Position near upper right corner of frame
Add drop shadow

Add a new raster layer & activate your tube tool
Add some greenery across the bottom & up a bit on both sides of your tag
Add drop shadow

Add your name & Text

Resize all layers to 75%

Add your © info

Save as jpg & you're all done!

I hope you enjoyed my tutorial

I would love to post your © compliant result, just email it to me with the tut name in the subject line

:)

========================
Result by Vickie

Result by Dixie


Result by Lori

Result by Deb

Result by Kaye


Wednesday, August 3, 2011

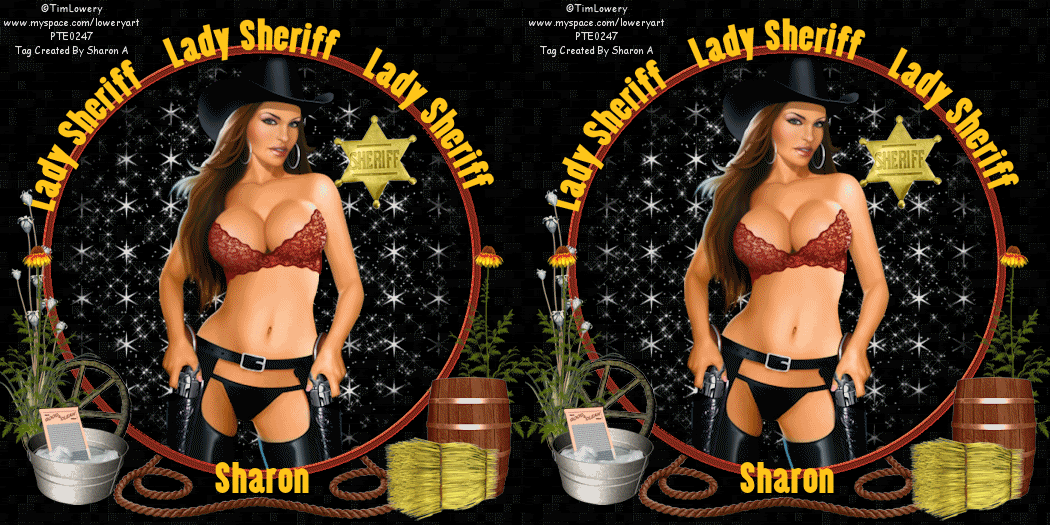
Lady Sheriff

Click for larger view

This tutorial was written by Sharon A on August 3, 2011
For more info read my TOU

Materials Needed
Scrapkit Cow Poke here
Mask #120 by Wee Scott Lass here

Plugins
Xero Fritillary
Eyecandy 4000 HSB Noise

The tube I used is by Tim Lowery, you will need a license to use which you can purchase from PTE here


Open a new transparent canvas 700x700, we will resize later
Floodfill with black
Apply Xero Fritillary changing the top & bottom numbers to 12

New layer
Floodfill with white

Apply mask
Merge group
Duplicate
Rename these layers to animation 1 & 2

Using your elipse tool click the blue circle under Mode
Width 15, foreground a color from your tube, background null
Draw a circle around the stars
Use your pick tool to resize as needed, you want the circle as large as the mask
Align Center
Do Not Convert to Raster!

Paste your tube as a new layer
Move below your circle layer
Resize as needed and/or use your eraser so none of your tube shows outside your circle

Paste wheel as a new layer
Resize to 30%
Position near bottom left

Paste tub 1 as a new layer
Resize to 30%
Position near bottom left, just below the wheel, refer to my tag

Paste branch 2 as a new layer
Resize to 50%
Position near bottom left
Move this layer to below the tub

Paste badge 1 as a new layer
Resize to 25%
Position near the top right inside the circle

Paste barrel 1 as a new layer
Resize to 30%
Position near lower right

Paste hay as a new layer
Resize to 30%
Position in front of the barrel

Paste sunflower 2 as a new layer
Resize to 50%
Position over barrel
Move this layer to below the barrel layer
Duplicate & mirror
Move this layer to below the tub layer

Paste rope 7 as a new layer
Resize to 50%
Position bottom center
Move this layer to below the circle layer

Activate your circle layer
Activate your text tool
Add a new Vector Layer
Take your text tool to the top of the circle on your new vector layer.  When you see an A with a 1/2 circle go ahead & click
Type the words Lady Sheriff 2 or 3 times with a few spaces in between each phrase
Convert to raster layer

Going back to your circle layer, convert to raster
Add bevel effect using bevel #3, width 3
Effects>Edge Effects>Enhance

Resize all layers to 75%

Add your © info & your name

Activate animation 1
Apply Eyecandy HSB Noise, default settings

Repeat on animation 2 clicking on the random seed button

Hide animation 1, merge visible
Copy & paste into animation shop

Undo your merge
Unhide animation 1
Hide animation 2
Merge visible
Paste after current in animation shop

Save as gif and you're all done!

I hope you enjoyed my tutorial

I would love to post your result, just email it to me.  Please remember to include the tut name in the subject line!

:)

==========================

Here are 2 results by Vickie

by Dixie


Tuesday, June 7, 2011

Mountain Stream

Click for larger view

This tutorial was written by Sharon on Feb 13, 2011
For more information read my TOU

Supplies needed
Sqirlz Water Reflection which is a free program.  You can get it here
For a tutorial on how to use the program go here but I'll show you what you need to know for this tut
Animation shop

Plugins
Eyecandy 5 Impact Gold Chrome Abstract Penny

You will need a mountain image with water.  The one I used is by Jon Rattenbury.  You will need a license to use which you can purchasehere
This image may be used with any PTE artist

The tube I used is by Tim Lowery.  You need a license to use which you can purchase here

Open your image, shift D to duplicate and close original

Resize to 85%
Copy and paste as a new image
Save to your hard drive and close

Back to your duplicated image
Undo resize
Gaussian blur radius 10

New layer
Apply eyecandy gold chrome abstract penny with default settings
Select all
Contract 5
Delete
Deselect
Effects>Edge Effects>Enhance
Merge down

Open your Sqirlz program
Open your resized image, the one you saved.  It will look kind of distorted but this will not show up in your result
With the selection tool (the one that looks kind of like a lasso) select around the water
When you end where you stared right click on it

Now click on the wavy lines up above
Leave everything on default except Motion Type, change this to E
Now click on Add Flow
I put the flow direction on 60 and the flow strength on 2
Click on the yellow arrow
X out of the settings
You'll now see your animation
If you're happy with it click on gif on the upper right
Click on ok
Name your animation
Click on ok again

Open animation shop
Open your animation
I have 20 frames
Select all
Copy and paste into your psp program

Now you will need to paste each layer onto your merged image

Activate the top layer
Select all>float>defloat
New layer
Apply eyecandy gold chrome with same settings as before
Contract 4
Delete
Enhance edge
Do Not Deselect

Paste your tube as a new layer
Resize as needed
Move to lower right
Invert your selection
Delete
Deselect
Merge down

Add your © info and any other text you may want to add
Merge down

Hide all layers except the top one and the bottom 2
Merge visible
Copy & paste into animation shop

Back to psp, undo your merge
Hide the bottom animation layer, the one above your background layer and unhide the 2nd one
Merge visible
Copy and paste after current in animation shop

Repeat these steps all the way up

You should have 20 frames

Frame properties 10

Save as gif and you're all done!

I would love to see your results, just email it to me.  The link is on the right

I hope you enjoyed this tutorial

:)


Result by Kaye W