Showing posts with label Dan Richards. Show all posts

Thursday, March 29, 2012

Bengal Tiger

Click for larger view

This tutorial was written by Sharon A on Mar 22 2012
For more info read my TOU

Supplies Needed
A photo
The one I used is # 5-2 by Dan Richards
You can purchase his artwork at CDO here

Plugins
DSB Flux Bright Noise
Graphics Plus Cross Shadow
Xenofex Constellation

The tube I used Bengal Tiger is by Concetta Kilmer, you can purchase this tube from CDO here

The name of my font is Franklin Cascaes


Open new transparent canvas 800x550, we will resize later
Floodfill with a color from your tube
Add an inner bevel
Apply dsb bright noise intensity 50, mix checed
Apply graphics plus cross shadow using default settings

Duplicate 2 times
Apply xenofex constellation with these settings
Click on settings then on reset to factory default
Check keep original image

Repeat on other 2 layers clicking the random seed button each time

Paste your photo as a new layer
Add an inner bevel
Add drop shadow twice

Paste your tube as a new layer
Resize as needed 
Position into place & add drop shadow

Resize all layers to 70%

Add your text, name & © info


Animation:

Hide animation 2 & 3
Merge visible
Copy & paste into animation shop

Undo your merge
Hide animation 1 & unhide #2
Merge & paste after current in animation shop

Undo your merge
Hide animation 2 & unhide #3
Merge visible & paste after current in animation shop

View your animation

Save as gif & you're all done!

I hope you enjoyed my tutorial

I would love to post your © compliant result, just emaail it to me with ATT Sharon & the tut name in the subject line

You'll find my email blinkie on your left 


:)

Result by Kaye W


Thursday, August 18, 2011

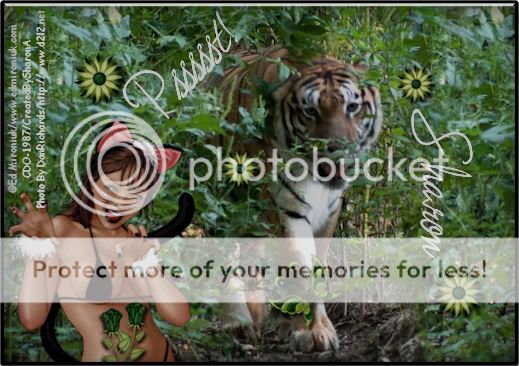
Pssssst!

Click for larger view

This tutorial was written by Sharon on August 18, 2011
For more info read my TOU

Supplies Needed
Scrapkit Gossamar Green here

Plugins
Eyecandy 5 Impact Glass

The tube I used is by Ed Mironiuk, you will need a license to use which you can purchase from CDO here

Photo by Dan Richards, his artwork is also available at the CDO Store
(For more info on using a CDO tube with a CDO photographer read item 23 on the CDO TOU page)


Open your photo
Shift D to duplicat & close original

Paste your tube as a new layer
Resize as needed
Position in the lower left corner
Add drop shadow

Paste laced butterfly as a new layer
Resize to 15%
Place into position & add a drop shadow

Paste tri colored flower no leaves as a new layer
Resize to 15%
Place into position and add drop shadow
Duplicate a few times and place around various areas
Merge these layers

Paste rose as a new layer
Resize to 15%
Place into position
Duplicate & mirror
Position together and lower one of them a bit

Add a new raster layer
Floodfill with black
Select all
Contract 5
Delete
Deselect
Add inner bevel using bevel 3, width 5

Add your name

Resize all layers to 80%

Add your © info

Apply eyecandy glass using default settings, changing the bevel width to 10

Save as jpg & you're all done!

I hope you enjoyed my tutorial

I would love to post your © compliant result, just email it to me with the tut name in the subject line

:)


Sunday, June 19, 2011

Have a Lovely Day

Click for larger view

This tutorial was written by Sharon on June 13, 2011
For more info read my TOU

Supplies Needed
Background scenery
Tiger tubes

Sqirlz Water Reflections, a free program which you can download here

Animation Shop

The tubes & background I used are by Dan Richards.  You will need a license to use which you can purchase here

Open your background image, shift D to duplicate
Close original

Paste your tubes as new layers
Resize as needed

Add your text and © info

Merge all layers

Resize to a normal tag size of your preference

Save

Do Not Close

Open your Sqirlz program
Open the image you just saved

Click on the circle located at the upper left side
Click your way around the water
When you get to your starting point, right click
You'll see lines around the water

Now, look at the tool bar at the top, you want to click on the icon that looks like waves

Click on Motion Type E
Leave everything else at the default settings
Click on the yellow arrow
You'll now see your animation

Click on where it says gif
Click ok
Name & click ok
click ok

Open up your animation in animation shop
Go back to psp and add your name
Copy & paste your name into animation shop
Multiply until you have at least as many frames as your animation has
Select all on both your name and the animation
Drag the first frame of the name onto the first frame of your animation & let go
View your animation to make sure it turned out ok

Leave the frame properties at the default of 10

Save as gif and you're all done!

I hope you enjoyed this tutorial

I would love to post your result, just email it to me

:)