Showing posts with label Big Beautiful Women. Show all posts

Tuesday, May 15, 2012

Beautiful Delights

Click for larger view

This tutorial was written by Sharon A on May 15, 2012 & is copyright protected
For more info read my TOU

Plugins
DSB Flux Bright Noise

The tubes I used are by Karina Dale, you can purchase these tubes from PTE here

The name of my font is Honey Script Light


Open a new transparent canvas 930x420, we will resize later
Floodfill with a gradient of your choice, radial, angle 0, repeats 0
I used a hue tint gradient
Apply bright noise intensity 20, mix checked

Paste your main tube as a new layer
Resize as needed
Add drop shadow
Position at the bottom center

Paste your close up tubes
Resize as needed
Position into place
Add drop shadow
Move to below your main tube layer

Paste your full size side tubes
Resize as needed
Position on the sides
Add drop shadow

Activate your picture tube tool
Select confetti
I set my scale to 35
Click around on random areas of your tag

Add a new raster layer & repeat

Add a 3rd raster layer & repeat

Duplicate your bg layer & send to the top
Select all
Contract 15
Delete & deselect
Add an inner bevel & drop shadow

Resize all layers to 70%

Add your text, name & © info


Animation:

Hide animation 2 & 3
Merge visible
Copy & paste into animation shop

Undo your merge
Hide animation 1 & unhide #2
Merge & paste after current in animation shop

Undo your merge
Hide animation 2 & unhide #3
Merge visible & paste after current in animation shop

View your animation

Save as gif & you're all done!

I hope you enjoyed my tutorial

Your comments are very much appreciated either here on this post or on the chat box.  I've made it easy for you to post on this tut by turning off the requirement of having to type in a confirmation code

I would love to post your © compliant result, just email it to me with ATT Sharon & the tut name in the subject line

You'll find my email blinkie on your left

:)


 Result by Kaye W


Tuesday, May 8, 2012

Waiting For You

Click for larger view

This tutorial was written by Sharon A on May 8, 2012 & is copyright protected
For more info read my TOU

Supplies Needed
Forum Template 71 by me here
Pattern, right click to save

Plugins
Xenofex Constellation

The tube I used Kali (70-1) is by Deacon Black, you can purchase this tube from CDO here

The name of the font I used is Heather


Open your template, shift D to duplicate & close original
Delete the info layer

Floodfill your bg layer with the pattern I provided or one of your choice
Add an inner bevel

Pick a medium shade color from your pattern
Floodfill your side rectangles
Add an inner bevel & drop shadow

Repeat on your top & bottom rectangles

Activate your lace 1 layer
Resize the Width to 90% (uncheck the lock aspect ratio button)
Position back into place
Change layer properties to overlay
Add drop shadow

Duplicate 2 times
Apply constellation
Settings on medium, keep original image checked
Repeat on other 2 layers clicking on the random seed button each time

Activate your rectangle layer
Floodfill with your last color

Activate your frame lace layer
Select all>float>defloat
Add a new raster layer
Floodfill with a light shade of your last color
Change layer properties to overlay
Merge down & add drop shadow

Floodfill your frame with your dark color
Add an inner bevel & drop shadow

Paste your tube as a new layer
Resize as needed
Position so she's resting against the bottom of the frame

Activate your bows layer
Add a new raster layer
Floodfill with white
On your bows layer select all>float>defloat
On your floodfill layer invert your selection, delete & deselect
Change layer properties to overlay
Merge down
Add drop shadow

Move your flowers to the lower corners
Merge down
Select all>float>defloat
Add a new raster layer
Floodfill with your light color
Invert your selection, delete & deselect
Change layer properties to burn
Merge down & add drop shadow
Duplicate & reposition at the top
Merge down

Resize all layers to 70%

Add your text, name & © info


Animation:

Hide animation 2 & 3
Merge visible
Copy & paste into animation shop

Undo your merge
Hide animation 1 & unhide #2
Merge & paste after current in animation shop

Undo your merge
Hide animation 2 & unhide #3
Merge visible & paste after current in animation shop

View your animation

Save as gif & you're all done!

I hope you enjoyed my tutorial

Your comments are very much appreciated either here on this post or on the chat box.  I've made it easy for you to post on this tut by turning off the requirement of having to type in a confirmation code

I would love to post your © compliant result, just email it to me with ATT Sharon & the tut name in the subject line

You'll find my email blinkie on your left

:)


Result by Kaye W


Friday, May 4, 2012

My Size

Click for larger view

This tutorial was written by Sharon A on May 4, 2012 & is copyright protected
For more info read my TOU

Supplies Needed
Corner here
Lace here

Plugins
Mura Meister Copies
Eyecandy Texture Noise

The tube I used Venus is by Joahannah von Frankenstein aka Koffin Kandy, you can get this tube from ART here

The name of my font is Mothers Day
I used size 60


Open a new transparent canvas 930x375, we will resize later
Floodfill with a color from your tube

Paste your tube as a new layer, I used raster 2 from my tube which is faded
Apply mura meister copies
Wallpaper rotate

Add gaussian blur, radius 12

Paste your lace as a new layer
Change layer properties to soft light
Add drop shadow

Paste your main tube as a new layer
Resize as needed
Add drop shadow

Activate your magic wand, tolerance 30
Hold down your shift key and click on the little squares behind the head of the tube
Duplicate 2 times

Apply eyecandy texture noise
Settings>tie dye
Repeat on other 2 layers clicking the random seed button each time
Deselect

Paste your close up tube as a new layer
Resize smaller than your main tube
Position in a lower corner
Add drop shadow
Duplicate & mirror

Paste your corner as a new layer
Resize to 20%
Position in lower left corner
Flip
Duplicate, mirror & merge down
Change layer properties to soft light
Add an inner bevel & drop shadow

Resize all layers to 70%

Add your text, name & © info


Animation:

Hide animation 2 & 3
Merge visible
Copy & paste into animation shop

Undo your merge
Hide animation 1 & unhide #2
Merge & paste after current in animation shop

Undo your merge
Hide animation 2 & unhide #3
Merge visible & paste after current in animation shop

View your animation

Save as gif & you're all done!

I hope you enjoyed my tutorial

Your comments are very much appreciated either here on this post or on the chat box.  I've made it easy for you to post on this tut by turning off the requirement of having to type in a confirmation code

I would love to post your © compliant result, just email it to me with ATT Sharon & the tut name in the subject line

You'll find my email blinkie on your left

:)


Thursday, May 3, 2012

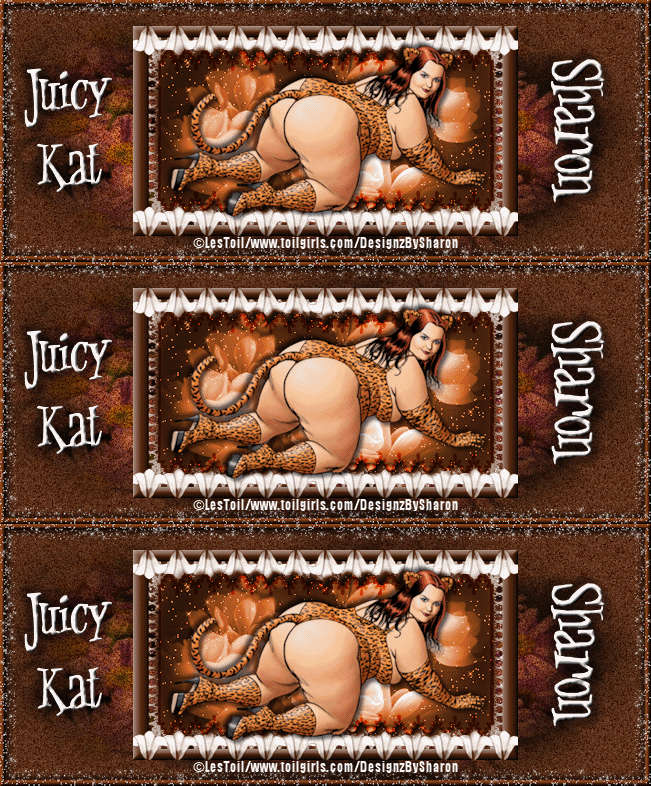
Juicy Kat

Click for larger view

This tutorial was written by Sharon A on May 3, 2012 & is copyright protected
For more info read my TOU

Supplies Needed
Flowers & Frame here

Plugins
DSB Flux Bright Noise
Graphics Plus Cross Shadow
Xenofex Constellation

The tube I used Juicy Kat is by Les Toil, his website is here
You can get his tubes from his official yahoo group fan club is here

The name of the font I used is Jungle Juice
I used size 72 & 85


Open new transparent canvas 930x375, we will resize later
Floodfill with a color from your tube
Apply bright noise intensity 35, mix checked

Add a new raster layer
Select all
Paste purple flowers into selection
Deselect
Change layer properties to overlay
Add drop shadow

Duplicate 2 times
Apply cross shadow using default settings
Repeat on other 2 layers changing the 2 bottom #'s to 108 & 88

Paste your frame as a new layer
Select all>float>defloat
Add a new raster layer
Floodfill with your bg layer
Deselect
Change layer properties to overlay

Click inside with your magic wand
Expand 3
Add a new raster layer
Floodfill with your bg color
Move to below your frame
Do Not Deselect

Paste your blue flowers as a new layer
Invert your selection
Delete & deselect
Change layer properties to luminance
Add drop shadow
Apply graphics plus cross shadow using default settings
Apply constellation
Settings>star field>keep original image checked

Add drop shadow to your frame

Paste your tube as a new layer
Resize as needed
Add drop shadow

Add a new raster layer
Floodfill with your bg color
Select all
Contract 8
Delete & deselect
Add an inner bevel & drop shadow
Apply constellation, same settings as before

Resize all layers to 70%

Add your text, name & © info


Animation:

Hide animation 2 & 3
Merge visible
Copy & paste into animation shop

Undo your merge
Hide animation 1 & unhide #2
Merge & paste after current in animation shop

Undo your merge
Hide animation 2 & unhide #3
Merge visible & paste after current in animation shop

View your animation

Save as gif & you're all done!

I hope you enjoyed my tutorial

Your comments are very much appreciated either here on this post or on the chat box.  I've made it easy for you to post on this tut by turning off the requirement of having to type in a confirmation code

I would love to post your © compliant result, just email it to me with ATT Sharon & the tut name in the subject line

You'll find my email blinkie on your left

:)


Monday, April 30, 2012

Angel With Horns


Click for larger view

This tutorial was written by Sharon A on April 30, 2012 & is copyright protected
For more info read my TOU

Supplies Needed
Supplies here

The tube I used Devious is a free tube by Lady Mishka, you can get this tube from PFD here

The name of my font is Tamborine
I used size 60


Open a new transparent canvas 930x375, we will resize later
Floodfill with a color from your tube
Add texture with these settings


Add a new raster layer
Select all
Paste your flower into selection
Deselect
Change layer properties to luminance legacy
Add drop shadow

Paste your tube as a new layer
Resize as needed
Position in a lower corner
Add drop shadow
Duplicate & mirror

Paste your lace as a new layer
Resize to 56%
Position in upper right corner
Duplicate, mirror & merge down
Add drop shadow
Move up so only the lacey part is showing, see my tag
Select around your tag with your selection tool
Crop to selection
Duplicate your lace
Flip & merge down

Paste your floral swirl as a new layer
Duplicate & rotate right 30
Repeat this 8 more times
You'll have 10 swirl layers

Resize all layers to 70%

Add your text, name & © info


Animation:

Hide all your swirl layers except the top one
Merge visible
Copy & paste into animation shop

Undo your merge
Hide your top swirl & unhide your second one
Merge & paste after current in animation shop

Repeat until you have all 10 frames pasted

Select all your frames & copy
Activate your last frame
Paste after current
Repeat 2 more times
You'll have 40 frames

Reverse the last 10 frames and change frame properties to 3

View your animation

Save as gif & you're all done!

I hope you enjoyed my tutorial

Your comments are very much appreciated either here on this post or on the chat box.  I've made it easy for you to post on this tut by turning off the requirement of having to type in a confirmation code

I would love to post your © compliant result, just email it to me with ATT Sharon & the tut name in the subject line

You'll find my email blinkie on your left

:)


Result by Kaye W


Friday, April 27, 2012

Devilicious

Click for larger view

This tutorial was written by Sharon A on April 27, 2012 & is copyright protected
For more info read my TOU

Supplies Needed
Flowers here

Plugins
Xenofex Constellation

The tube I used Chubby Twisted is by Popeye Wong, you can get his ftu tubes here
If you haven't been there lately he has some new tubes

The font I used is called Shower Flower
I used size 42 all caps


Open a new transparent canvas 930x375, we will resize layer
Floodfill with black
Select all

Add a new raster layer
Paste your flower into selection
Deselect
Add drop shadow

Paste your tube as a new layer
Resize as needed
Add drop shadow

Duplicate & position on one side
Resize to 75% and leave in the position it landed
Duplicate, mirror & merge down

Apply constellation
Settings>small star constellation>overall star density 0>twinkle amount 75>keep original image checked

On your big tube layer
Zoom in on the tail & activate your freehand selection tool
Select around the tail
Copy & cut
Erase any lines
Paste as a new layer
Postion back into place & duplicate

Rotate right 25
Position back into place
Activate your clone tool & cover up the gap

Activate the original tail move to above the rotated one
Duplicate & rotate left 25
Do same as you did with the other tail
Rename these layers to tail 1, tail 2 & tail 3

Resize all layers to 70%

Add your text, name & © info
I added the constellation effect to my text & name changing overall density to 4


Animation:

Hide animation tail 2 & 3
Merge visible
Copy & paste into animation shop

Undo your merge
Hide tail 1 & unhide 2
Merge & paste after current in animation shop

Undo your merge
Hide tail 2 & unhide 3
Merge visible & paste after current in animation shop

Copy frame 2 and paste afer frame 3

I set my frame properties at 20

View your animation

Save as gif & you're all done!

I hope you enjoyed my tutorial

Your comments are very much appreciated either here on this post or on the chat box.  I've made it easy for you to post on this tut by turning off the requirement of having to type in a confirmation code

I would love to post your © compliant result, just email it to me with ATT Sharon & the tut name in the subject line

You'll find my email blinkie on your left

:)


Result by Kaye W


Wednesday, April 25, 2012

Big Bold Sexy

Click for larger view

This tutorial was written by Sharon A on April 25, 2012 & is copyright protected
For more info read my TOU

Supplies Needed
Lace here
I got this from Mrs Homer Lynn's blog here
Flower here

Plugins
Screenworks Fabric Weave
Graphics Plus Cross Shadow
Eyecandy Texture Noise
Xenofex Constellation
Xero Porcelain

The tube I used Dale (PTE3074) is by Karina Dale, you can purchase this tube from PTE here

The font I used is called Tagettes
I used size 42 & 48


Open a new transparent canvas 930x375, we will resize later
Floodfill with a color from your tube
Apply screenworks fabric weave
Apply graphics plus cross shadow using default settings

Paste your lace as a new layer
Resize to 75%
Position at the top
Duplicate, flip & merge down
Change layer properties to multiply
Add an inner bevel & drop shadow

Duplicate 2 times
Apply eyecandy texture noise
Settings>tie dye
Repeat on other 2 layers clicking the random seed button each time

Paste your close up tube as a new layer
Resize as needed, leave big enough to cover your tag from top to bottom
Move off the edge so you see no space between your tube & the edge of your tag
Change layer properties to multiply
Add drop shadow
Duplicate, mirror & merge down
Using your selection tool select around your tag & crop

Paste your main tube as a new layer
Resize as needed
Position near the bottom
Apply xero porcelain using default settings
Add drop shadow

Paste your flower as a new layer
Resize to 50%
Position over the straight edge of your close up tube
Change layer properties to luminance
Add drop shadow
Duplicate, mirror & merge down

Resize all layers to 70%

Add your text, name & © info

On your text & name add constellation
Settings>star field, keep original image checked


Animation:

Hide animation 2 & 3
Merge visible
Copy & paste into animation shop

Undo your merge
Hide animation 1 & unhide #2
Merge & paste after current in animation shop

Undo your merge
Hide animation 2 & unhide #3
Merge visible & paste after current in animation shop

View your animation

Save as gif & you're all done!

I hope you enjoyed my tutorial

Your comments are very much appreciated either here on this post or on the chat box.  I've made it easy for you to post on this tut by turning off the requirement of having to type in a confirmation code

I would love to post your © compliant result, just email it to me with ATT Sharon & the tut name in the subject line

You'll find my email blinkie on your left

:)


Tuesday, April 24, 2012

Proud BBW

Click for larger view

This tutorial was written by Sharon A on April 23, 2012 & is copyright protected
For more info read my TOU

Supplies Needed
Floral Mist here

Plugins
Screenworks
Graphics Plus Cross Shadow
Xenofex Constellation
Xero Porcelain

The tube I used Mona DePlume (PTE4203) is by Karina Dale, you can purchase this tube from PTE here

The name of my font is Tagettes

This is the first of my Big Beautiful Women tuts


Open a new transparent canvas 930x375, we will resize later
Floodfill with a color from your tube
Apply screenworks fabric weave
Apply graphics plus cross shadow using default settings

Paste your flower as a new layer
Add drop shadow
Duplicate
Position on the left
Duplicate & mirror
Move the center flower to above the other ones
Resize to 75%
Merge all 3

Duplicate & resize to 75%

Go back to the first flower layer and change layer properties to exclusion
Duplicate 2 times
Apply xenofex constellation
Click on settings then on a few small stars
Click the keep original image button
Repeat on other 2 layers clicking on the random seed button each time

Paste your close up tube as a new layer
Resize as needed
Position on one side
Add drop shadow
Apply xero porcelain using default settings
Dupliceate & mirror

Resize to 75%
Position in lower corner

Paste your main tube as a new laeyr
Resize as needed
Add drop shadow
Repeat the porcelain effect

Add a new raster layer
Floodfill with your color
Contract 8
Delete & deselect
Add an inner bevel & drop shadow
Repeat constellation effect, change settings to starfield, keep original image checked

Resize all layers to 70%

Add your text, name & © info


Animation:

Hide animation 2 & 3
Merge visible
Copy & paste into animation shop

Undo your merge
Hide animation 1 & unhide #2
Merge & paste after current in animation shop

Undo your merge
Hide animation 2 & unhide #3
Merge visible & paste after current in animation shop

View your animation

Save as gif & you're all done!

I hope you enjoyed my tutorial

Your comments are very much appreciated either here on this post or on the chat box.  I've made it easy for you to post on this tut by turning off the requirement of having to type in a confirmation code

I would love to post your © compliant result, just email it to me with ATT Sharon & the tut name in the subject line

You'll find my email blinkie on your left

:)


Result by Kaye W