Showing posts with label Pinup Toons. Show all posts

Sunday, July 8, 2012

Oriental Beauty

 Click for larger view

This tutorial was written by Sharon A on July 8, 2012 & is copyright protected
For more info read my TOU

Plugins
Xero Fritillary
Xero Porcelain
DSB Flux Bright Noise
Xenofex Constellation

The tube I used 148-3 is by Pinup Toons, you can purchase this tube from CDO here

The name of the font I used is Tagettes


Open new transparent canvas 930x420, we will resize later
Floodfill with a color from your tube
Apply fritillary changing the top # to 16 & the bottom # to 12

Paste your close up tube as a new layer
Resize as needed
Duplicate

Position one of the tubes to one side
Change layer properties to soften
Duplicate & mirror

Add a drop shadow to your main tube
Apply xero porcelain using default settings

Using your magic wand select the flowers in the hair and the lip
Duplicate 2 times
Apply dsb flux bright noise, intensity 35, mix checked
Repeat on other 2 layers changing intensity to 40 & 45

Resize all layers to 70%

Add your text, name & © info

Apply constellation to your text & name
Settings on low density stars, keep orginal image checked


Animation:

Hide animation 2 & 3
Copy merged & paste into animation shop

Undo your merge
Hide animation 1 & unhide #2
Copy merged & paste after current in animation shop

Undo your merge
Hide animation 2 & unhide #3
Copy merged & paste after current in animation shop

View your animation

Save as gif & you're all done!

I hope you enjoyed my tutorial

Your comments are very much appreciated either here on this post or on the chat box.  I've made it easy for you to post on this tut by turning off the requirement of having to type in a confirmation code

I would love to post your © compliant result, just email it to me with ATT Sharon & the tut name in the subject line

You'll find my email blinkie on your left

:)


Result by Kaye W


Friday, April 27, 2012

I Love You Mom

Click for larger view

A Mothers Day Tag

This tutorial was written by Sharon A on Apr 27, 2012 & is copyright protected
For more info read my TOU

Supplies Needed
Forum Template 69 by me here
Pink Lilac here

Plugins
DC Special Nylon
DSB Flux Bright Noise
Xenofex Constellation

The tube I used Cameo Heart (124-1) is by Pinup Toons, you can purchase this tube from CDO here

The name of the font I used is Luvable
I used size 48


Open your template, shift D to duplicate.  Close original
Delete the credit & large butterfly layers

Floodfill your bg layer with a color from your tube
Add texture>default settings>fine canvas

Darken your shade and floodfill your rectangle layer
Add an inner bevel & drop shadow
Duplicate 2 times
Apply constellation
Settings>lots of stars>keep original image checked
Repeat on other 2 layers clicking the random seed button each time

Darken your color again & floodfill your bars
Add an inner bevel & drop shadow
Apply dc special nylon using default settings

Floodfill your rectangle 2 layer with your bg color
Add an inner bevel & drop shadow
Apply dsb flux bright noise intensity 50, mix checked

Activate your big bubble layer
Layer properties>lighten
Select all>float>defloat
Add a new raster layer
Paste your lilac into selection
Deselect
Rotate left 45
Duplicate, mirror & merge down
Duplicate, flip & merge down
Move to below your big bubble layer
Add drop shadow

Paste lilac again
Resize to 40%
Postion to one side of your big bubble
Add  drop shadow
Duplicate, mirror & merge down

Paste your tube as a new layer
Resize as needed and add drop shadow
Line up the bottom of her dress with the bottom of the bubble

Activate your left butterfly
Select all>float>defloat
Add a new raster layer
Floodfill with one of your colors
Deselect
Layer properties>dodge
Merge down
Add drop shadow

Repeat with your right butterfly
Layer properties>hard light

Activate your left bubble
Layer properties>lighten

Repeat with your right bubble

Activate your border layer
Add a new raster layer
Floodfill with one of your colors, I used my dark
On your border layer select all>float>defloat
On your floodfill layer invert your selection, delete & deselect
Layer properties>dodge
Merge down
Add drop shadow
Apply dsb flux bright noise intenstiy 75, ligher checked

Resize all layers to 70%

Add your text, name & © info


Animation:

Hide animation 2 & 3
Merge visible
Copy & paste into animation shop

Undo your merge
Hide animation 1 & unhide #2
Merge & paste after current in animation shop

Undo your merge
Hide animation 2 & unhide #3
Merge visible & paste after current in animation shop

View your animation

Save as gif & you're all done!

I hope you enjoyed my tutorial

Your comments are very much appreciated either here on this post or on the chat box.  I've made it easy for you to post on this tut by turning off the requirement of having to type in a confirmation code

I would love to post your © compliant result, just email it to me with ATT Sharon & the tut name in the subject line

You'll find my email blinkie on your left

:)


Result by Priscie


Result by Kaye W


Tuesday, March 13, 2012

Girls Rule

Click for larger view

This tutorial was written by Sharon A on March 12, 2012
For more info read my TOU

Supplies Needed
Scrapkit Girls Rule by babsbitzbeez here

Plugins
Eyecandy 4 HSB Noise

The tube I used Cameo Heart is by Pinup Toons, you can purchase this tube from CDO here


Open new transparent canvas 700x550, we will resize later
Select all
Paste paper 9 into selection
Deselect

Paste your tube as a new layer
Add drop shadow

Paste frame 9 as a new layer
Using your magic wand click inside the frame
Expand 3
Add a new raster layer
Paste paper 17 into selection
Move to below your tube layer
Deselect

Go back to your tube layer & resize as needed


Activate your rectangle tool
Foreground null, background set to a color from your tube
Draw a rectangle across the width of your tag
Align Center
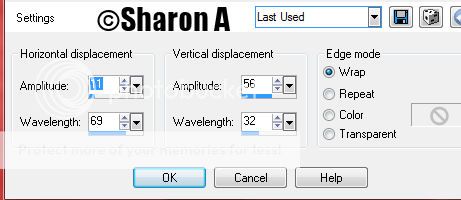
Effects>Distortion Effects>Warp
Use these settings


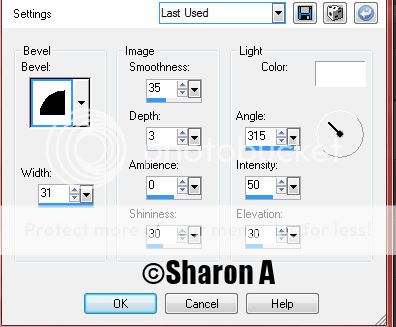
Add an inner bevel with these settings


Move to just above your background layer
Duplicate 2 times
Rename these layers to animation 1, 2 & 3
On animation 1 apply Eyecandy HSB noise using default settings
Repeat on other 2 layers clicking the random seed button each time

Activate your top layer

Paste eyeshadow as a new layer
Resize to 20%
Rotate left 30
Position near bottom left
Add drop shadow

Paste blush as a new layer
Resize to 20%
Rotate left 25
Position near eyeshadow
Add drop shadow

Paste compact as a new layer
Resize to 15%
Position near the last 2 elements
Add drop shadow

Paste lipstick as a new layer
Resize to 20%
Rotate right 25
Position with other makeup layers
Add drop shadow

Paste heart charm as a new layer
Resize to 35%
Position on left side
Add drop shadow

Paste glasses as a new layer
Resize to 20%
Rotate left 25
Position left side of frame
Add drop shadow

Resize all layers to 70%

Add your text

Add your text, name & your © info

Animation


Hide animation 2 & 3
Merge visible
Copy & paste into animation shop

Undo your merge
Hide animation 1 & unhide #2
Merge & paste after current in animation shop

Undo your merge
Hide animation 2 & unhide #3
Merge visible & paste after current in animation shop

View your animation

Save as gif & you're all done!

I hope you enjoyed my tutorial

I would love to post your © compliant result, just email it to me with the tut name in the subject line

:)


Sunday, September 18, 2011

Simply Pink

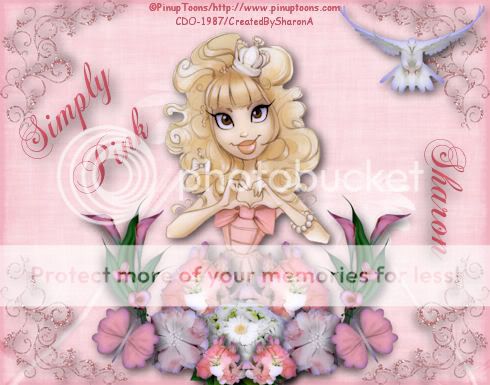
Click for larger view

This tutorial was written by Sharon on Sept 18, 2011
For more info read my TOU

Supplies Needed
Scrapkit Simply Pink by Doris here

Plugins
Xero Porcelain

The tube I used Cameo Heart is by PinUp Toons, you can purchase this tube from CDO here


Open new transparent canvas 700x550, we will resize later
Select all
Paste paper 1 into selection
Deselect

Paste glitter doodle 1 as a new layer
Resize to 25%
Position lower left corner
Add drop shadow
Duplicate & mirror
Merge down
Duplicate & flip

Paste your tube as a new layer
Apply xero porcelain using default settings
Add drop shadow

I applied the porcelain effect to all the element layers starting here

Paste flowers 3 as a new layer
Resize to 30%
Position bottom center
Add drop shadow

Paste flowers as a new layer
Resize to 25%
Position on one side of flowers 3
Add drop shadow
Duplicate & mirror
Merge down
Move to below flowers 3

Paste flower 3 as a new layer
Resize to 30%
Position left of flowers 3
add drop shadow
Duplicate & mirror

Paste calla lillies as a new layer
Resize to 30%
Position on right side of the flower arrangment
Add drop shadow
Duplicate & mirror
Merge down
Move to below flower 3 layer

Go back to the flowers layer (the first pink ones you did)
Send to top
Resize to 60%
Position bottom center

Paste dove as a new layer
Resize to 35%
Position near upper right
Add drop shadow

Paste butterfly 1 as a new layer
Resize to 15%
Position as shown on my tag
Add drop shadow
Duplicate & mirror

Resize all layers to 70%

Add your text

Add your name & your © info

Merge all

Save as jpg & you're all done!

I hope you enjoyed my tutorial

I would love to post your © compliant result, just email it to me with the tut name in the subject line

:)