

Click for larger view
This tutorial was written by Sharon on August 17, 2011
For more info read my TOU
Supplies Needed
Scrapkit Beautiful here
Mask #11 by WSL here
The tube I used is by Henning Ludvigsen, you will need a license to use which you can purchase from PTE here
Open a new transparent canvas 700x700, we will resize later
Floodfill with white or a color from your tube
New raster layer
Select all
Paste paper 7 into selection
Deselect
Apply your mask
Merge group
Add drop shadow
Paste lace 5 as a new layer
Add drop shadow
Resize to 120%
Paste lace 4 as a new layer
Add drop shadow
Paste your tube as a new layer
Resize as needed
Duplicate
Rename these layers to animation 1 & 2
Paste flower 6 as a new layer
Resize to 50%
Position on the center left of your mask area
Rotate right 20
Add drop shadow
Paste flowers 3 as a new layer
Resize to 50%
Position at the top center of your mask area
Add drop shadow
Move this layer to below your tube layer
Paste bow 1 as a new layer
Resize to 40%
Position at the bottom center of your mask area
Add drop shadow
Paste butterfly 2 as a new layer
Resize to 40%
Position right side of your mask area
Add drop shadow
Add your name
Resize all layers to 75%
Add your © info
Animation
Activate animation 1
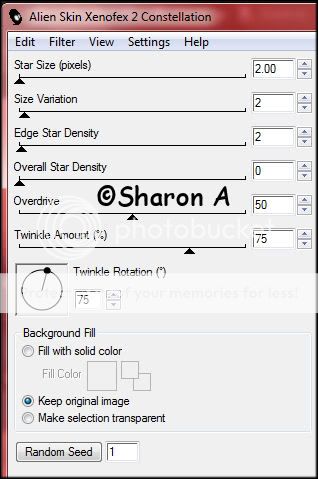
Add xenofex constellation with these settings
Activate animation 2
Repeat constellation effect clicking on the random seed button
Hide animation 1
Merge visible
Copy & paste into animation shop
Undo your merge
Unhide animation 1
Hide animation 2
Copy & paste after current in animation shop
Save as gif & you're all done!
I hope you enjoyed my tutorial
I would love to post your © compliant result, just email it to me with the tut name in the subject line
:)
No comments:
Post a Comment
Please keep your language clean, thank you!